

During the past 28 years of stitching beads on cloth, I've veered away from making necklaces, bracelets, and bags or purses, mostly producing wall art pieces. Thus, I've had lots of opportunities to experiment with various methods of finishing and framing my work, making it suitable for display.


But the problem with this method, of course, is that the surface of the beading is exposed to dust and air-borne grime, which over the years may spoil the fresh look of the beading, aging the piece prematurely. So we look to frames and glass to protect our work.
Among the various methods for covering (and protecting) beadwork with glass, the following is the one I use most frequently, and like the best. It's not very expensive, or particularly difficult, although it does take a bit of time. Even if you already know about frames, please take a look at the section called Preparing Your Bead Embroidery for Framing in the Tutorial below.
Tutorial: How to Frame bead Embroidery
Choosing a Frame
This tutorial assumes the beaded work has straight sides, and will be framed in a square or rectangular frame. The frame size, color, and style are important considerations.
Wanting viewers to look at my beading and not be distracted by an overly fancy, gaudy, or large frame, I generally select a plain, narrow frame in a color that compliments my beading without competing for the viewer's attention. Sometimes I choose a stained, wooden frame if it seems to fit the theme of my beadwork better than a metal frame. Depending on the size of my beadwork, I generally size my frame at 2-3 inches more on each side than the beadwork.
Frame: Often I use a painted, metal frame with a cross section similar to this.

I either buy it as a kit (pre-cut pieces and required assembly hardware), assembling it myself, or buy it from a frame shop. The advantage of buying from a framer is that you will be able to see samples. Also, the framer can cut an accurate mat, foam core insert, and backing board for you, and can supply the needed risers. If you decide to work with a framer, I suggest you print this post (to show the framer how you will be preparing your work for the frame), or take the prepared bead embroidery with you to the frame shop.
Glass: I believe in using the highest quality glass, even though it is a lot more expensive than ordinary glass. The UV resistance is good, but the primary reason for using premium glass is its clarity, which allows the viewer to see the details of your work without any distortions or color shift, as if there were no glass at all. Note: do not use non-glare glass. It only works if it lies directly on the surface of the art. You will be putting risers under the glass so it sits above the uneven surface of your bead embroidery, not touching any of the beads; even at this slight distance from the beadwork, non-glare glass will look frosted and obscure the details of your work.

Risers: Dense plastic rods, risers are 1/8th inch square in cross-section, with an adhesive surface on one side. Use a wire nipper to cut the rods to fit along the outer edge of the glass; remove the paper strips covering the adhesive from the the risers, adhering them to the glass along the edges, as shown above. They prevent the glass from touching your beadwork, by resting on the outer edge of the mat, thus holding the glass above the beaded surface. If the surface height of your beadwork is greater, you can adhere two rods together, making a quarter-inch of space. If the depth is more than a quarter-inch, you might want to consider mounting your work in a shadowbox frame (see this post for a good example and instructions).

 For the next step, you will need at least a 1.5 inch margin of un-beaded fabric all around your beadwork. If you have less than a 1.5 inch margin, cut strips of any cotton fabric (re-purposed sheet or shirt fabric is fine). Using a zig-zag stitch on the sewing machine, and placing the strips under the margin of the beaded fabric (wrong side), stitch the strips to the margins, extending them to a total of 1.5 inch from the edges of your beadwork on the top, bottom, and both sides.

Glass: I believe in using the highest quality glass, even though it is a lot more expensive than ordinary glass. The UV resistance is good, but the primary reason for using premium glass is its clarity, which allows the viewer to see the details of your work without any distortions or color shift, as if there were no glass at all. Note: do not use non-glare glass. It only works if it lies directly on the surface of the art. You will be putting risers under the glass so it sits above the uneven surface of your bead embroidery, not touching any of the beads; even at this slight distance from the beadwork, non-glare glass will look frosted and obscure the details of your work.
Other Framing Materials You Will Need
Mat: Choose a simple, acid-free, neutral-colored mat, either warm or cool white, depending on the emotional message and colors in your work. All those beautiful colors in the framer's palette are appealing, but for most bead embroidery, there is color and texture enough in the beads, and no value in adding more with your mat choice. If you do not have a mat cutter, a framer can cut your mat. Although I have not ever used a double mat (because I find them distracting, bringing my eyes away from the beadwork to the edges), it could be a way to gain a little more space for the glass above the beadwork.

Risers: Dense plastic rods, risers are 1/8th inch square in cross-section, with an adhesive surface on one side. Use a wire nipper to cut the rods to fit along the outer edge of the glass; remove the paper strips covering the adhesive from the the risers, adhering them to the glass along the edges, as shown above. They prevent the glass from touching your beadwork, by resting on the outer edge of the mat, thus holding the glass above the beaded surface. If the surface height of your beadwork is greater, you can adhere two rods together, making a quarter-inch of space. If the depth is more than a quarter-inch, you might want to consider mounting your work in a shadowbox frame (see this post for a good example and instructions).
3/16th Inch Foam Core Board: Since your beadwork will be mounted directly into this foam core board, be sure to use the white, acid-free, buffered, slightly more expensive variety. You can buy it at art supply or frame shops, in person or on line. You will need a piece at least 3 inches larger than your bead embroidery on each side.
Preparing Your Bead Embroidery for Framing

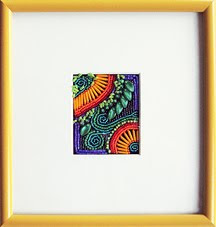
The piece above is the example used in the the steps which follow. It's a small piece of bead embroidery, measuring only 1-3/4 inches wide by 2-1/4 inches high. The mat is 2 inches larger on each side. Numerous folks have surprised me with high offers to buy this piece (which is not for sale), illustrating that nicely framed bead embroidery can be sold at a favorable price.
Mounting your bead embroidery in foam core board
As per the recommendations in the frame section above, draw the frame size (which will always be designated by the inside dimensions, the size of the artwork) on a piece of 3/16th inch foam core. Use a mat knife and ruler to accurately cut out this shape.
Then, measuring carefully, making sure it is exactly centered, draw lines to indicate the outline of your bead embroidery, adding 1/2 inch on each side. For example, if your beaded area was 2 inches wide, you would draw your lines 3 inches apart (2" for the beadwork plus 1/2 inch on each side). Designate one edge as the top, and mark. Draw a vertical arrow from the top through part of the center through part of the outside margin. With a mat knife, cut out the center, being careful not to damage it or the outside frame. The cut out center will eventually be placed back in the hole by aligning the arrow segments drawn on the back.

Center your beadwork on the cut-out piece of foam core board. Hold in place using map or sewing pins, pushed straight through the beading down into the board. Wrap the fabric snugly around the board and pin from the back. Remove the pins from the front. Check to make sure the work is still centered accurately. Re-pin if necessary. Using a sewing needle and beading thread, stitch from side to side, lacing the fabric around the foam core, as in the example below. Start with the longer sides. Knot when finished. Then do the same on the shorter sides.
Tip: I like to rest the beaded side face down on a thick, folded, bath towel while I am lacing the back.
Tip: I like to rest the beaded side face down on a thick, folded, bath towel while I am lacing the back.

This is how mine looks on the front after being laced around the foam core board on the back. If I had not wanted to frame this piece, I could have used double-sided, archival tape to adhere a heavy paper backing over the laced area on the back; it could then be displayed on a small stand similar to the one in the second photo from the top of this post.

This is how it looks on the back, when it is placed back in the original hole cut into the foam core board. Notice how the arrows match up, insuring a perfect fit.

This is how it looks on the front. Note: the hole in the mat will be cut exactly to the size of the beadwork, so that when it is framed, you will not see any of the fabric around the outside edge of the beaded area.

Assembling a Bead Embroidery Sandwich
Now it's time to make a sandwich with the foam core board between two pieces of acid-free mat board, one which has a beveled hole cut in the center, the other which is solid and goes on the back.

To cut my own mats, I first measure and draw the exact outline of my bead embroidery centered on the wrong side of the mat. I always mark the top, because sometimes the work is not precisely square or rectangular. Of course you can give the dimensions to a frame shop, and have a professionally-cut mat made for your beadwork.
Tip: One way to get an exact measurement of the beaded area is to make a 100% copy of it on a scanner or copy machine. Cut out the copy with a ruler and mat knife, test it by holding it over your beadwork. If it is exact, use it as a template to mark the hole on the mat board. If the mat is hand-cut, the hole does not have to be precisely square or rectangular.
Tip: One way to get an exact measurement of the beaded area is to make a 100% copy of it on a scanner or copy machine. Cut out the copy with a ruler and mat knife, test it by holding it over your beadwork. If it is exact, use it as a template to mark the hole on the mat board. If the mat is hand-cut, the hole does not have to be precisely square or rectangular.

Using a special, beveled, mat-cutting tool, I then cut away the center, where the beading will show.

Here is how the top and middle of the sandwich looks, with the mat placed on top of the foam core board and beadwork.

The photo above shows a piece of mat board cut for the sandwich back (on the right). Note that I've drawn around the laced beadwork, and cut away a layer of the mat board to make space for the laced fabric in the sandwich. Do this by gently cutting along the drawn lines, being careful not to cut very deeply into the mat. Then, use a knife to lift one corner of the inside area and peel it back creating a shallow empty space.

This is what the completed sandwich looks like. The beading is supported well between two pieces of mat board, and can't shift when hung. No glue or tape (to later fail or chemically alter the mat or beading) is necessary in this process. And it looks so neat and professional!
Assemble the Frame
With the more challenging steps already completed, the final assembly goes very quickly !

Assemble the bottom and sides of the frame by inserting the metal corner plates, and tightening the tension screws. Insert and tighten the corner plates into the top of the frame. Make a double-decker sandwich by putting the glass with the attached risers on top of the mat. Be sure the glass is clean and clear of any finger prints. Slide the complete d-d-sandwich into the obvious slot in the bottom part of the frame. The hanging wire can be added now or later.

Slip the corner plates at the top of the frame into the slots on the sides, and tighten the tension screws. You should have gotten metal spring strips with your frame kit. Lay them out on the back, spaced evenly around. Push down on the center of a spring and slide it under the edge of the frame, between the backing mat and the frame. Do the same with each of the springs. If you haven't already, add a hanging wire. Add a felt or rubber wall-bumper to each of the lower corners.

That's it! You are finished... your bead embroidery is ready to hang on your wall! For those who would like a little more detailed step-by-step explanation of how to assemble this type of frame, this is a good one or if you prefer videos, this one is pretty complete.
Tip: Whether using a metal or wooden frame, the depth of the frame is an important consideration because the d-d-sandwich will be thicker than a photograph or most paintings. The measurement of the depth, or space inside the frame structure to accommodate the thickness of the artwork, is called the rabbet. The rabbet measurement on the above metal frame is 9/16th of an inch, which is adequate with a single riser under the glass. But it's a tight fit, the springs having to be nearly flat when inserted. If I had used a double riser, I would need a frame with a deeper rabbet. I've found it rather difficult to find small, narrow, simple, plain, wooden frames with a deep enough rabbet.
Here is a link for downloading this post as a printable PDF. It's a free, and slightly expanded version of what you've seen above. Free Download: How to Frame Bead Embroidery by Robin Atkins


Thank you so much for taking the time to write this post and for sharing your wisdom! I am going to print it off and study it in detail. There is a spark of hope in me that I can learn this, and a huge desire to do more bead embroidery art.
ReplyDeleteYou are welcome! And, YES, you can learn this!!!
DeleteI hope you waited to print it, as I've edited and added a few tips to it today. Soon, I plan to produce this post as a printable PDF file available on the web through my website. I'll post a link on this post when I get it finished.
Great tutorial Robin and equally applicable to framing any kind of textile work. If the beaded work doesn't have excess material around it (I usually work the whole area) a few carefully placed single stitches can be used to anchor the work to the foam core, securing the stitch with some archival tape. They will be invisible on the original work.
ReplyDeleteDo you order all of your supplies from a framer, the risers, archival tape etc? How does that work out cost wise compared to someone framing it for you?
The framer I worked with (I worked briefly as an assistant framer) would use steel pins along the edge of the foam core to secure the textile/embroidery rather than sew.
She felt it provide a more even tension than using thread.
I have just got back to beading after a hiatus and I am finishing off my 2010 bead journal project. Just completed October and just started November. When I finished I plan to secure them on a plain canvas. Eventually I will add a frame and glass but it would be too expensive to frame 12 20x16 pieces altogether. Here are all the first beaded journal pages done in 2007-08 framed on my wall - https://www.instagram.com/p/-fTX00JNVP/?taken-by=jacquiboydalden
Thanks for posting the link to your framed BJP pieces! They are so great! Yes, you are right about using this technique for other kinds of textile work. Yay!
DeleteWhile I agree that double-stick, archival tape can be used to secure the work onto the foam core, I don't trust it over a long time. Will it hold for 50 years? So, I ALWAYS leave a significant margin of un-embellished cloth around the edges of my work. I could always cut some (or all) of it away, but so far, those fabric margins have been a blessing when it comes to finishing!
I like to see, touch, and examine the quality of my frames and framing supplies, so I work with a local framer to obtain what I need. It helps to keep him in business, and at the same time, satisfied my need for quality control.
As for steel pins, I've never tried them. If rust isn't a problem, I guess they'd work fine. Still, I think I'll stick to sewing. Nice to know about an alternate way though. Thanks.
Hi Robin... Thank you for this great tutorial. Most of my bead embroidery is wearable, but these instructions will come in handy for some bigger pieces.
ReplyDeleteYou are welcome, Genevieve! Nice to hear from you. :)
DeleteWonderful. My local community college has a framing class which I want to take, but I would guess there are very limited instructions for framing anything with depth. Thank you.
ReplyDeleteYou are welcome, KJ! I've always welcomed every opportunity to learn more about finishing and framing, whether or not it is directly applicable to my needs at this time. I learned about not using glare-free glass the hard way, and had to replace it on one of my pieces. But most of what I've learned has been from other people and from good framers. Sounds like you're following that path too. Bravo!
DeleteThought you might like to know... I followed the link for the .pdf in FireFox and got some weird partial sentences on page 2. I used the same link in Chrome and all was good. It could be my computer or it could be a FireFox hic-up. Thanks for the .pdf version.
DeleteThanks, KJ! I just opened it in FireFox, and everything was fine on all of the PDF pages. Maybe your computer had a hiccup? Glad it worked for you in Chrome.
DeleteDefinitely going to print off for the future. I think it will work well with felt pictures. Thank you.
ReplyDeleteThanks, Evanna! Just so you know, I intend to have a PDF version ready within a few days. I'll post the link on FB BJP page. It will print (and look) better than a printed version of the post. I agree that this method of framing could be used for your felt pictures, although to work well, the felt might have to be sewn onto a fabric backing. Let me know, please, if/when you try it!
DeleteYour work is always beautiful...and this is so helpful! Thanks!
ReplyDeleteThanks Sue! Now you can download it as a PDF, here: http://robinatkins.com/Frame_Bead_Embroidery_Atkins.pdf
DeleteLovely work and a really informative blog. Found by chance via Sue Spargo pics.
ReplyDeleteThis is brilliant as finishing is one of my weaknesses. I've just added a link to one of your earlier posts and included a picture on my blog as I've shamelessly copied one of your ideas. I know you've been very generous in the past about allowing me to feature your work so I hope you don't mind me doing it again. I'm a little worried that I'm becoming like one of those 'best friends' at school who copies everything you do! Anyway, you can see it at http://saffiland.blogspot.co.uk/2016/02/robins-cross-bead-quilt.html Let me know if you want me to remove/change anything.
ReplyDeleteI took my first piece to be framed professionally. The glass is not non reflective, just regular but seems like it's too reflective and I can't capture the beauty of it. I'm not sure what glass to ask for next time. 😢
ReplyDeleteI definitely learnt about leaving a margin for framing! Also the framer mustn't be experienced with this type of framing as a few beads are squashed as its not deep enough. I'm angry they didn't care to fix this and bow I'm left with the problem. Was expensive too.
THANK YOU!!! This is such wonderful information. Ive tried to do this before, but I was doing it wrong. now i wll go redo some pieces and Im working on some new ones now. Im so excited. aTHANKS FOR SHARING
ReplyDelete